painofhell

 Posts : 669 Posts : 669
Birthday : 1990-05-18
Join date : 2014-08-16
Age : 33
Job/hobbies : forex
 |  Subject: stop loss protection Subject: stop loss protection  Mon Aug 25, 2014 12:33 pm Mon Aug 25, 2014 12:33 pm | |
| The Purpose of Using a Protective Stop LossThe first reason for you to use a stop loss on every trade that you take is quite simply to protect your account. If you trade intelligently in a way such as has been outlined so far you will have a ‘price action reason’ for where you place your stop loss. There will be a chart pattern at a great location that once entered will have an obvious failure point where you are wrong. You will see exactly what is meant by that in this lesson.The next reason to use a protective stop loss is because it will define your risk and this is information that you can use. Before you even enter a trade you need to know your risk so you can compare it to your potential reward. This piece of the puzzle will be clarified in a later lesson about risk vs reward. Stop Loss Placement Without LayersUsing our 3 recent examples we first examine a stop loss placement strategy without using layers. You will then be able to compare this against how things are done with layers further down this page. This will then also help you with your understanding of the reasons behind the strategy itself since they both follow the same concept.Trend Continuation BuyIn this first example of the trend continuation you can see that we are trading the mirror flip support & resistance location. This mirror flip made into a clear visual thanks to the green swing line and the support & resistance box. Furthermore this box was already re-tested by the next layer of price movement down which created the area of demand marked by the first X. This essentially involves a second layer without mapping one out on the chart. It does however help us pinpoint the exact area that we are trading giving us a pinpoint place for our stop loss.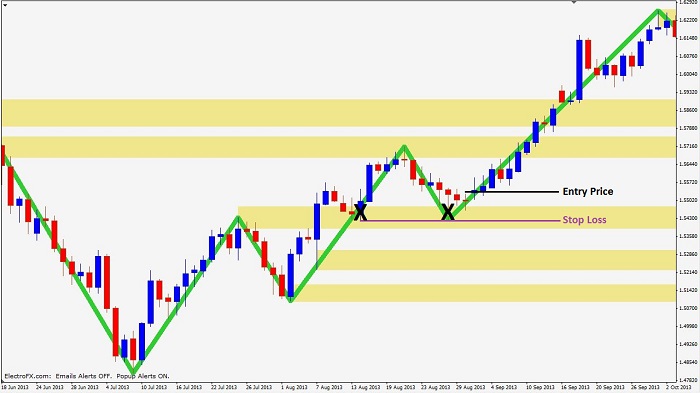 The idea here is that we can see where there was previously order flow and have returned to it, the chart patterns are looking good and so is the location. If price however were to break the price that is the first X on the above screenshot, then our analysis would be wrong and therefore there is no point in holding the trade any longer. Allowing a few pips buffer on your stop loss is always a good idea but there is no need to allow price to break that first X by very much.Double Top SellThis next example is the double top trade and here the location was inherent in the chart pattern itself. The area that we are trading is given a clear visual thanks to the green swing line and the resistance box. The location was created by that first green swing of selling down and marked by the first X on the chart just below. As the entry trigger forms at the retest of that same area, marked by the second X on the chart, it is clear which area we expect to hold and therefore we have a pinpoint place for our stop loss. The idea here is that we can see where there was previously order flow and have returned to it, the chart patterns are looking good and so is the location. If price however were to break the price that is the first X on the above screenshot, then our analysis would be wrong and therefore there is no point in holding the trade any longer. Allowing a few pips buffer on your stop loss is always a good idea but there is no need to allow price to break that first X by very much.Double Top SellThis next example is the double top trade and here the location was inherent in the chart pattern itself. The area that we are trading is given a clear visual thanks to the green swing line and the resistance box. The location was created by that first green swing of selling down and marked by the first X on the chart just below. As the entry trigger forms at the retest of that same area, marked by the second X on the chart, it is clear which area we expect to hold and therefore we have a pinpoint place for our stop loss. The idea remains the same, we can see where there was previously order flow and have returned to it, the chart pattern and overall market structure looks great and so is the location. If price were to break the high that is the first X on the above chart then our expected chart pattern would no longer be valid. This would make our analysis wrong and there would be no point holding the trade any longer. A few pips buffer on your stop loss would be a good idea but there is no need to allow price to break that first X by very much.3-Point Turn BuyThe next example was the 3-point turn which was also a trend following mirror flip location of the double top highs. Just like our first example the image below essentially involves a second layer without mapping one out on the chart. The area of demand, marked by the first X on the chart below, helps try to pinpoint a place where order flow in the correct direction started last time price was here. This gives us an area that we expect to hold and therefore a place for our stop loss. The idea remains the same, we can see where there was previously order flow and have returned to it, the chart pattern and overall market structure looks great and so is the location. If price were to break the high that is the first X on the above chart then our expected chart pattern would no longer be valid. This would make our analysis wrong and there would be no point holding the trade any longer. A few pips buffer on your stop loss would be a good idea but there is no need to allow price to break that first X by very much.3-Point Turn BuyThe next example was the 3-point turn which was also a trend following mirror flip location of the double top highs. Just like our first example the image below essentially involves a second layer without mapping one out on the chart. The area of demand, marked by the first X on the chart below, helps try to pinpoint a place where order flow in the correct direction started last time price was here. This gives us an area that we expect to hold and therefore a place for our stop loss. The theme continues and we are trading the retest of an area that has already proven itself. The chart patterns and structure look good along with the location. If price were to break the low that is at the base of the first X on the above chart then we may be wrong in our analysis. There would be no point holding the trade any longer but a buffer of a few pips would be wise. This trade is very much a trend following setup that is also a high/low breakout style trade that is also taught here at ElectroFX.com. This type of setup does allow the choice of just using the second X as your stop loss but you will learn about that later on if you decide to continue your studies here. The theme continues and we are trading the retest of an area that has already proven itself. The chart patterns and structure look good along with the location. If price were to break the low that is at the base of the first X on the above chart then we may be wrong in our analysis. There would be no point holding the trade any longer but a buffer of a few pips would be wise. This trade is very much a trend following setup that is also a high/low breakout style trade that is also taught here at ElectroFX.com. This type of setup does allow the choice of just using the second X as your stop loss but you will learn about that later on if you decide to continue your studies here. Stop Loss Placement With LayersWhen using layers the concept does not change at all but the information that you have to work with does. You will still justify your location in the same way as before but when it comes to the stop loss things are slightly different. Without layers you were following the idea of a location being created, then a location being retested and confirmed by the entry trigger. The stop loss was simply going two peaks back from those two reactions. Nothing changes with the idea but now with layers you have a faster way to look at what is two peaks back.Trend Continuation BuyOur first example of the trend continuation has no change in how you determined good location and what type of trade you are in. The addition of an extra layer here though shows you a 3-point turn type of reaction accompanied by an entry trigger. Following the same stop loss concept on a smaller scale, two peaks back is now a little different but still relays the same type of proof that you can use and react too.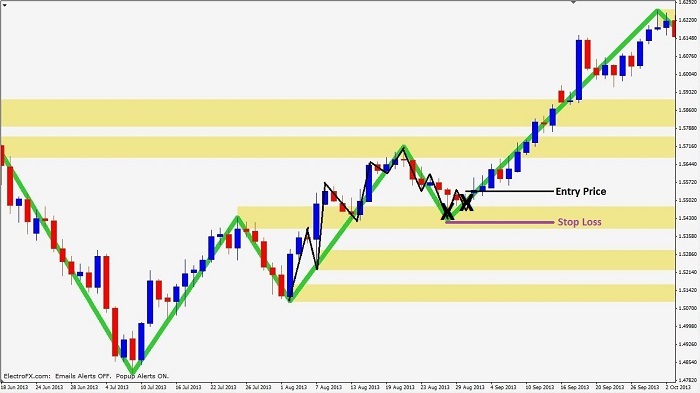 In the above image you can see how two peaks back on the new layer effects how you see your stop loss. In the case of this trade the use of layers makes little difference to your stop loss but the concept should be getting clearer for you now.Double Top SellThis next example of our double top shows you again what was just outlined for you. The reaction and retest of the area you are trading is much closer together but the location and type of trade is based on not trading with the extra layer. The two X’s on the below screenshot give you a visual on what is now two peaks back. In the above image you can see how two peaks back on the new layer effects how you see your stop loss. In the case of this trade the use of layers makes little difference to your stop loss but the concept should be getting clearer for you now.Double Top SellThis next example of our double top shows you again what was just outlined for you. The reaction and retest of the area you are trading is much closer together but the location and type of trade is based on not trading with the extra layer. The two X’s on the below screenshot give you a visual on what is now two peaks back.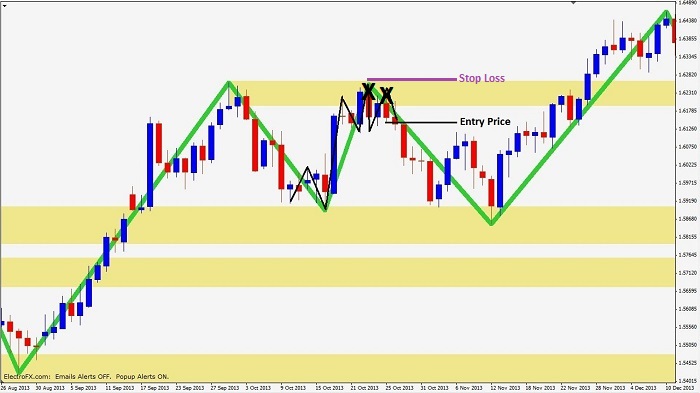 Just like the previous example of the trend continuation there has been no real change in your stop loss for this trade. It is looked at a little differently but your end result stop loss price has barley changed. The use of layers here just helped you with pinpointing which entry trigger to use and gave you more proof to work with.3-Point Turn BuyOur last example is the 3-point turn after the break of the two double top highs. Things are slightly different here but the concept remains unchanged and repeatable. There are two choices when reading your stop loss placement on this trade and both are perfectly OK. You can go two peaks back on the black swing line as we have been doing so far, or you can observe the upside down head and shoulders pattern and realize that is the area you are trading. Just like the previous example of the trend continuation there has been no real change in your stop loss for this trade. It is looked at a little differently but your end result stop loss price has barley changed. The use of layers here just helped you with pinpointing which entry trigger to use and gave you more proof to work with.3-Point Turn BuyOur last example is the 3-point turn after the break of the two double top highs. Things are slightly different here but the concept remains unchanged and repeatable. There are two choices when reading your stop loss placement on this trade and both are perfectly OK. You can go two peaks back on the black swing line as we have been doing so far, or you can observe the upside down head and shoulders pattern and realize that is the area you are trading. Using layers on this trade changes your options significantly both for entry triggers to use and stop loss placement. The great thing is that all of them work out because the chart patterns, location, and overall market structure was all on your side. The power of trading based on visible proof should not be underestimated. Using layers on this trade changes your options significantly both for entry triggers to use and stop loss placement. The great thing is that all of them work out because the chart patterns, location, and overall market structure was all on your side. The power of trading based on visible proof should not be underestimated. Stop Loss Size Doesn’t Have to MatterA quick tip to wrap up this lesson is about your stop loss size because many people do get all wrapped up in it. The fact is that if you trade in the way outlined here at ElectroFX.com you will always know the size of your stop loss before you enter a trade. This means that you could risk a percentage of your account based on the size of that stop loss, which in turn means that the size of your stop loss doesn’t matter. The only thing that should matter is basing all of your decisions on proof and making sure that you never risk more than you are trying to gain. In the next lesson we will look at how support & resistance, chart patterns, and the overall market structure can also be used to determine where the best take profit will be. Knowing your risk vs reward pre-trade is a very powerful tool.  |
|


